Quilt Along, Part II
You learn a lot of things during any major project, and I certainly expect to learn a great deal from this one. I am committed to trying the methods and suggestions that Elizabeth makes in her directions as part of my attempt to take my quilting “up a notch”. The very first surprise of the quilt making process was sooner than most: I discovered that the Amy Butler fat quarters I had chosen for my block fabrics were actually half yard cuts, not fat quarters. No worries. All this means is I’ll have enough to make another quilt with them. I’ll need to if I want to keep any of them since my daughter took one look at the fabrics and called “dibs” on this quilt. It will be perfect for her next living arrangements at college – a house with three other girls and three other boys. That should be interesting.
So I cut all the fabrics. It took be three sessions; which is unusual. Ordinarily I cut everything for a quilt at one time. For this one I did two “dominant” fabrics and two companion fabrics at once, separating them for their individual blocks. I did use the card stock to keep the cut blocks all arranged as Elizabeth suggested. I have used this kind of system in the past and it works well.
I ended up re-sewing all of the Block A’s to improve my quarter inch measurement. I can’t remember if I’ve ever actually measured blocks this much, probably not, but I committed to doing all the recommended measuring as a way to improve my quilting knowledge and technical expertise. I changed to my quarter inch foot, which I do not always use when I quilt. It seemed to be the right foot for this project.
Blocks A and B were rather straight-forward. I had already decided to use seams pressed open for this project, so I was pleased when Elizabeth recommended this method. (More about this next post!) I keep a travel iron at my sewing station, so I could press seams open as I went. However, I quickly discovered that was not enough to obtain the requisite “flatness” that I desired and that Elizabeth’s pictures exhibited. Therefore, after each set of blocks I took them downstairs to my steamer and made sure the seams were firmly pressed open and the blocks laid completely flat. This helped with the final measurements.
I found that my quarter inch seam is pretty accurate, but my cutting is a little scant. I welcomed the freezer paper hint for Block C and used freezer paper on all six of those blocks.
Block D was extremely simple and went together quickly: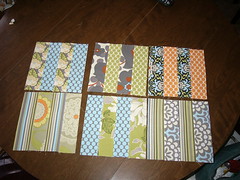
Blocks E and F were constructed of small pieces. I have done a lot of square in a square quilting and would ordinarily use a strip piecing method to construct these blocks. I was also a bit concerned about Elizabeth’s habit of sewing with the seams on top. I would ordinarily use the feed dogs to my advantage and place whichever of the two pieces was a tiny bit larger on the bottom. *note to self, put a comment up on Elizabeth’s blog asking why she chose this method*.
Staying true to my efforts to try new ways of doing things, I used her method exclusively for at least the first 4 blocks. I only flipped the seams to the bottom when that piece was more than a few threads longer. This would be a good time to talk abut the effect of the feed dogs on two completely identical pieces of fab ric. The feed dogs pull the bottom fabric through a bit quicker, leaving the frustrated quilter who started with “perfect” pieces, with dealing with a slight unevenness at the end of the joining. I don’t know how Elizabeth handles this, but I have decided to use it to combat any lingering desire for perfectionism that might possibly remain dormant in my psyche. Unfortunately many women suffer from entirely too much self flagellation due to perfectionism. Is it dna or learned? I don’t know, but I do know we need to stamp that sucker OUT!
I found I had that my E squares came out remarkably accurate, whereas my F squares needed every bit of freezer paper I could iron to them. Go fig.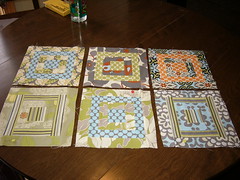

Finally, all the blocks are ready to be displayed on my design wall – or more accurately, my design floor! I used the layout Elizabeth suggested, although I’m wondering if I should alter my blocks with the orange dots. They seem grouped a little strangely….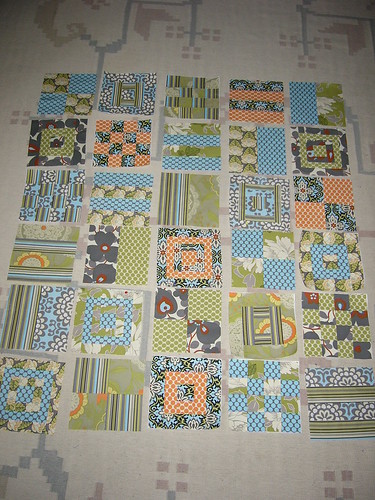
On to the sashing!
Labels: Quilt Along, quilting
posted by fujifunmum at 8:58 PM
![]()

3 Comments:
Hi there, I discovered your blog by the use of Google while searching for a comparable subject, your
site came up, it looks good. I've bookmarked it in my google bookmarks.
Hello there, simply was aware of your blog through Google, and located that it is truly informative. I'm gonna be careful for brussels.
I'll appreciate should you proceed this in future. A lot of people can be benefited from your writing. Cheers!
Also visit my homepage :: dental implant costs
The other day, while I was at work, my sister stole my apple ipad and tested to see if
it can survive a 30 foot drop, just so she can be a youtube sensation.
My apple ipad is now destroyed and she has 83 views.
I know this is totally off topic but I had to share it with someone!
my website :: costs of dental implants
Hi there, I would like to subscribe for this webpage to obtain most up-to-date updates, so where can i
do it please help out.
my weblog - igamershood.com
Post a Comment
<< Home